2014: A Year in Review

Can you believe it’s 2015?! Last year just FLEW by, but when I go back and review all the posts from 2014, it really is amazing how much happened. Thanks to all of you who have stuck around and continue to offer your advice and words of encouragement – I love you all!

I’ll create a to-do list for 2015 tomorrow, but first let’s take a look back of some of the best posts of 2014:

DSC00473
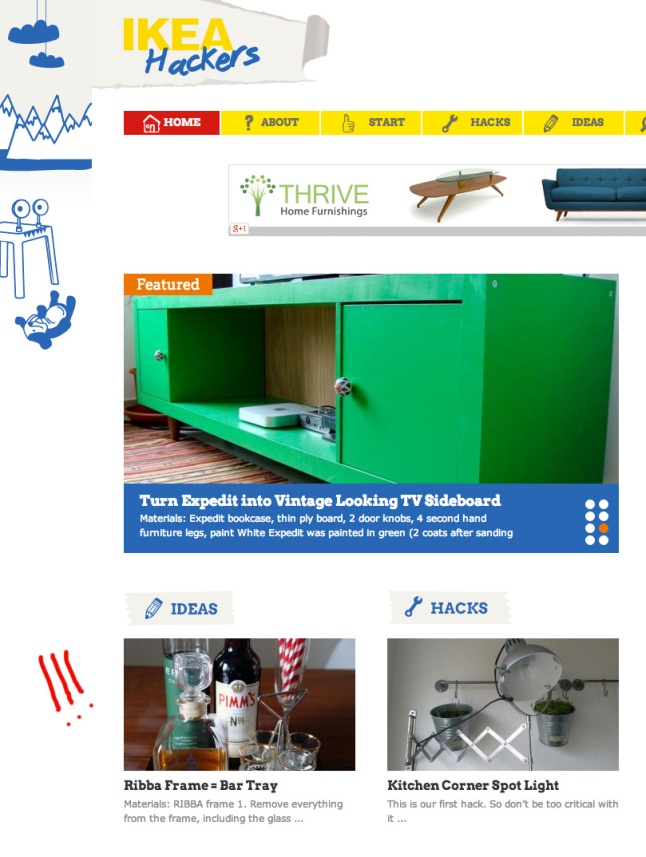
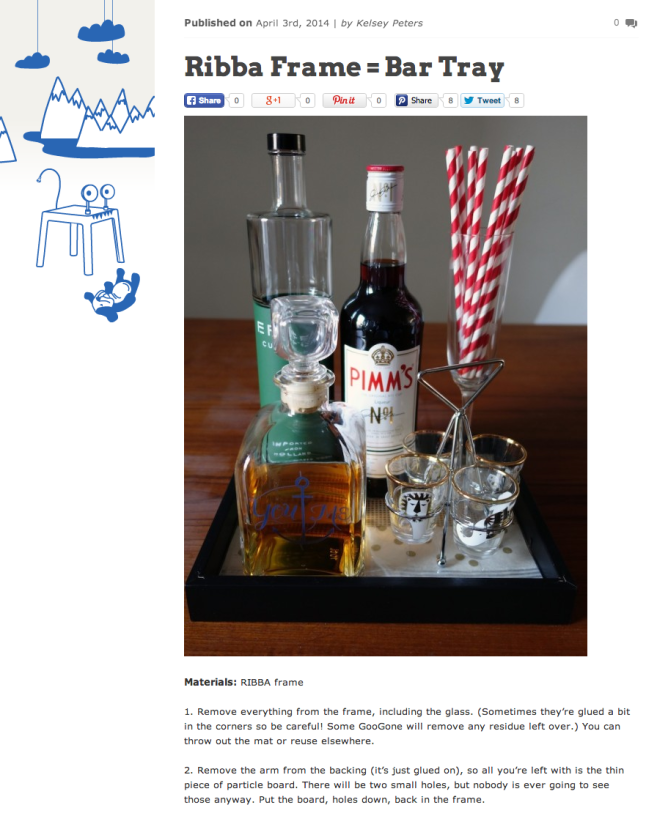
Most popular post: A step-by-step look at how to turn an IKEA Ribba frame into a bar tray garnered the most clicks this year – and it was even picked up by IKEA Hackers!

Most commented on post: Remember when y’all helped me pick out a new living room rug? Great job, by the way.

DSC01014Best before/after: I’m so happy I finally bit the bullet and gave my living room a navy accent wall like the ones I’d been admiring on Pinterest forever. Will I regret it when I move out and have to paint it back white? Only time will tell…

Still on my wish list: This may just be the year that I tackle my first upholstery project, so I better pick up “Spruce: A Step-by-Step Guide to Upholstery and Design” to prepare.

11Best trip: Sometimes the best trips are the ones that are last minute and random and cheap – that happened to be Kansas City for me this year.

Best purchase: I know this is a home design blog, but this Kipling tote has been a godsend this past year. The blogging fashionistas of the world certainly don’t have anything to worry about, but I know a good bag when I see one.

friendsgivingBest party: I finally pulled off a Friendsgiving this year! The place looked great, and I hope it’ll mark the begin of many dinner parties to come. I love hosting.

Greatest accomplishment: I trained and ran a friggin’ marathon. 26.2 miles. I never in my wildest dreams thought I would ever say that. Hell, I could barely run the 5 miles during soccer two-a-days in high school! It felt amazing.

DSC00683Best recipe: I just made this Parmesan Ranch Snack Mix for a New Year’s Eve party… so, so good – and ridiculously easy!

IKEA Hack and Quiz

SUPER exciting news, guys: Urban Nesting is on IKEA Hackers!!! Remember the RIBBA frame that I turned into a bar tray a couple weeks ago? It’s featured on their landing page today!

IKEAHackersI don’t think I’ve ever been picked up by another blog so I’m thrilled! If you ended up here from IKEA Hackers and you do this “hack” (really it’s just more of, say, a reconfigure), please leave a comment or send pictures—I’d love to see how yours turned out. I’m thinking about making another one with a larger RIBBA for the living room. It’s just so cheap and customizable—two things that so rarely go together.

RIBBAframe

Speaking of IKEA, I’m loving the “What’s Your Spring Style?” quiz they sponsored over on Lonny. I know I’ve been really into quizzes lately, but I’m not apologizing—I’m stressing over the painting I’m hoping to do in a few weeks! I’m dreaming about paint colors at night, and needless to say, I’m constantly looking for inspiration. But I think this quiz totally hit the nail on the head:

Screen Shot 2014-04-03 at 12.29.36 PM

I don’t know if I’ll be putting up a flag anytime soon (though I’m not opposed to it), but seersucker? Yes. Stripes? Yes. G&Ts? Please!

Now, who wants to go to Cape Cod with me?

DIY: Bar Tray from a RIBBA Frame

I am in love with the styled bar carts all over Pinterest. Who isn’t? But when you already have a full-on bar in your apartment, adding a bar cart is a bit overkill. My family already thinks I’m an alcoholic. (I swear I’m not, Aunt Tracy!) 

As much as I love my bar, I’d mostly neglected it as of late, and the middle display cabinet had become storage for knick-knacks I couldn’t find a place for. Exhibit A:

oldbarSo I decided to clean the whole thing out and use some of that Pinspiration to set up a vignette of my own.

The problem: $10 budget. The solution: Work with what you have! (The other problem is taking pictures of something that has a mirror behind it… don’t judge! These aren’t the best.)

DSC00475The common denominator in the bar cart pics I liked was a serving tray. It added visual interest to break up (metaphorically) a bunch of glassware. But not only was I limited on budget, I was also limited on size: It had to be less than 10 inches wide for it to fit in the cabinet and the glass door to still be able to close.

I looked and looked and the closest thing I could find at the right size was a bathroom tray. But it looked… well, like a bathroom tray.

So I got creative! How many of those trays do you think are actually used for serving people? Hardly any, right? They’re decorative. So I just needed something that resembled a tray. Who needs handles anyway?

I’ve been on a big organizing kick (more on that later), and so I just happened to also be cleaning out my closet, where I store a lot of (other) household things that are looking for a home or are seasonal. Low and behold, a RIBBA frame falls into my lap—quite literally. (Luckily, the glass didn’t break!) And it was the PERFECT size.

DSC00472Here’s how to make your own:

1. Remove everything from the frame, including the glass. (Sometimes they’re glued a bit in the corners so be careful! Some GooGone will remove any residue left over.) You can throw out the mat or reuse elsewhere.

2. Remove the arm from the backing (it’s just glued on), so all you’re left with is the thin piece of particle board. There will be two small holes, but nobody is ever going to see those anyway. Put the board, holes down, back in the frame.

3. Cut decorative paper to size and place on top of the board in the frame. Scrapbook paper, wrapping paper, a scrap of fabric, something cut out of a magazine—almost anything will work!

4. Place the glass on top of the paper/fabric. And ta-da! That’s it. You have yourself a customized serving tray in less than 10 minutes.

DSC00473Now, you could definitely get more involved than this. For instance, there’s little metal clasps around the outside of the frame that are used to hold the picture in and the back on. You could get a pair of pliers and remove those or flatten them. They’re generally pretty hard to see though once the board, paper and glass are all back in there.

I’d also suggest adding a few of those stick-on felt buffers (you usually put them on furniture legs so they don’t scratch up wood flooring) on the front of the frame for good measure.

DSC00480I already had all this stuff, so essentially the cost for me was free, but let’s say you had to buy everything: It’d still come out to under $10!

Frame, $4.99
Paper, $3.99 (we’ll pretend it’s fancy paper)

barnewLuckily, the RIBBA series comes in black and white, and a few different sizes so it should be easy to find a “tray” that works for you. (Not to mention the endless possibilities if you bring spray paint and/or washi tape into the mix.)

Have you done any projects with RIBBA frames?